Introduction
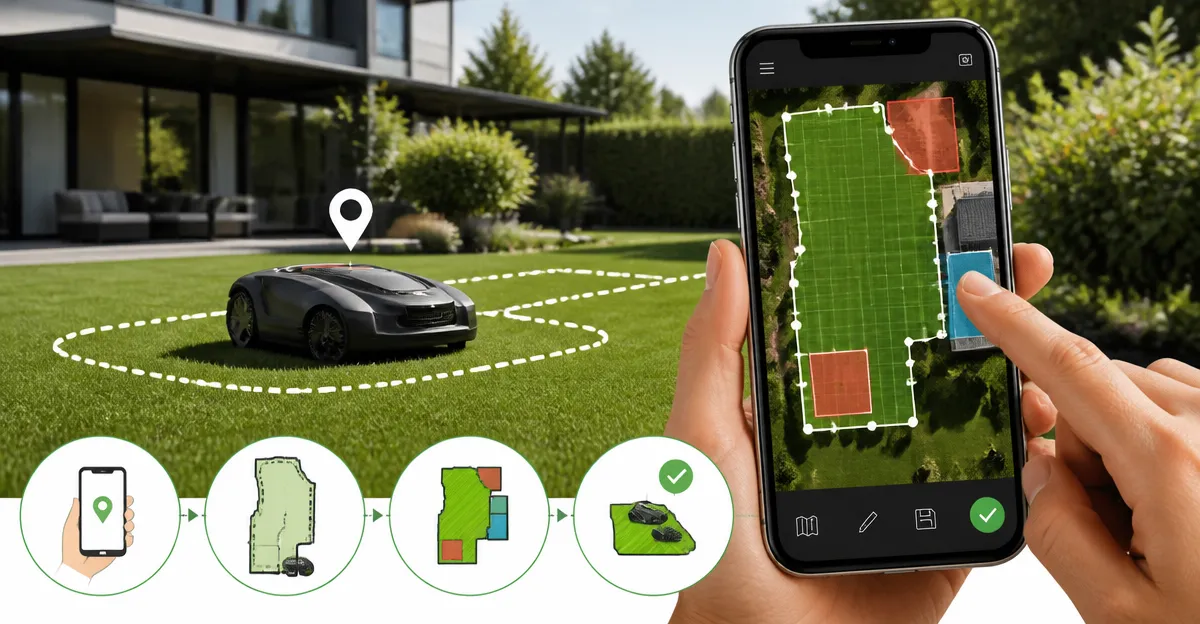
This guide explains how to use a mapping application to define exact mowing zones for a robot mower. Readers will understand the workflow from initial app installation to fine‑tuning zone boundaries, and will discover how each step reduces manual effort while improving cut quality. The instructions are written for homeowners who already own or plan to purchase a robotic mower, yet the principles apply to any automated lawn‑care system. By following the steps, one can achieve a consistently manicured lawn with minimal supervision.
Precise zone creation prevents the mower from entering flower beds, pet areas, or steep slopes, thereby protecting both the landscape and the equipment. Moreover, well‑defined zones enable the mower to follow the most efficient path, conserving battery life and shortening mowing time. The following sections break the process into manageable actions, recommend reliable products, and provide troubleshooting tips for common obstacles.
What You’ll Need
- Smartphone or tablet compatible with the mower’s native app.
- Wi‑Fi or cellular connectivity for remote control.
- Measuring tape or laser distance tool for verifying zone dimensions.
- Optional accessories: magnetic boundary strip, RTK extension cable, or extra blades, depending on the mower model.
- One of the recommended robot mowers listed below.
Step 1: Install and Register the Mapping App
Begin by downloading the official application for your robot mower from the App Store or Google Play. Open the app, create an account, and follow the on‑screen wizard to pair the mower via Bluetooth or Wi‑Fi. During registration, grant location permissions so the app can access satellite data for precise positioning. The initial connection may require scanning a QR code found on the mower’s control panel.
For users of the YARDCARE AI Vision Robot Mower, the companion app includes AI vision obstacle detection, which simplifies the mapping process by automatically identifying garden ornaments and pet toys. The mower’s 4.8‑star rating and quiet operation make it an ideal starter unit for homeowners who value ease of setup.
Once the device appears online, perform a firmware update if prompted; this ensures the latest navigation algorithms are active. Updating before mapping prevents later incompatibilities and reduces the likelihood of stray zone errors.
Step 2: Establish Physical Boundaries and No‑Go Zones
Physical boundaries guide the mower’s virtual map and act as a safety net for areas that the software may misinterpret. The YARDCARE model ships with a 32‑foot magnetic strip that can be placed around flower beds, pools, or pet enclosures. The strip creates a magnetic field that the mower’s sensors recognise as an exclusion zone, eliminating the need for buried perimeter wires.
Install the strip by laying it on the ground and securing it with the supplied stakes. Use the app’s “Draw No‑Go Zone” tool to align the virtual boundary with the physical strip; the mower will then avoid crossing the line during operation. This combination of hardware and software provides a reliable safeguard, especially in yards with irregular shapes.
Owners of the ECOVACS Goat O1000 RTK Mower can take advantage of the included RTK extension cable. The cable allows the RTK antenna to be positioned on a higher pole, improving satellite reception and yielding centimeter‑level accuracy. This is particularly useful for large properties where signal loss could cause the mower to stray into prohibited zones.
Step 3: Create and Label Multiple Mowing Zones
Modern mapping apps support multi‑zone management, enabling separate schedules for front yards, backyards, and side strips. Open the app’s map editor and use the “Add Zone” function to outline each area. Assign a descriptive name, such as “Front Lawn – High Traffic” or “Side Garden – Low Cut,” and set individual cutting heights and schedules.
The Mammotion LUBA 3 AWD Robot Mower offers advanced tri‑fusion navigation, which combines 360° LiDAR, NetRTK, and dual‑camera AI vision. Its app allows up to 30 zones, making it ideal for complex properties with slopes up to 80 %. The mower’s 4.3‑star rating reflects its capability to handle steep terrain while maintaining precise zone adherence.
When defining zones, consider the mower’s cutting width and battery capacity. For example, a 0.15‑acre yard may be divided into two 0.075‑acre zones to ensure the mower can complete each pass without needing a mid‑task recharge. This strategy maximises efficiency and reduces wear on the battery.
Step 4: Test Zones and Adjust Parameters
After zones are created, initiate a short test run for each area. Observe the mower’s path on the live map; the app will display real‑time location, speed, and obstacle encounters. If the mower deviates from the intended path, edit the zone boundaries or add additional magnetic strips to reinforce the exclusion area.
The Husqvarna 410iQ Robot Mower utilizes Exact Positioning Operating System (EPOS) for centimeter‑accurate navigation, which can be valuable during fine‑tuning. Its ability to pause mowing during rain and resume automatically reduces the risk of uneven cuts caused by weather interruptions.
Adjust cutting height based on grass type and seasonal growth. Most mowers, including the Segway Navimow i206 AWD Mower, offer a range of 2–3.6 inches; setting the height to the lower end during rapid growth maintains a tidy appearance, while raising it during drought conserves water.
Step 5: Schedule Regular Maintenance and Updates
Once zones operate smoothly, configure a recurring schedule that aligns with the lawn’s growth rate. Most apps allow you to set different frequencies for each zone, such as twice weekly for high‑traffic areas and once weekly for peripheral grass. Consistent mowing prevents the mower from encountering tall, dense grass that could strain the blades.
Periodically inspect the magnetic strip, RTK cable, and mower blades for wear. The YARDCARE mower includes replacement blades in its accessory kit, ensuring that users can quickly restore cutting performance without additional purchases. The ECOVACS model provides 36 extra blades as part of its CARE bundle, reducing long‑term maintenance costs.
Finally, check for firmware updates monthly. Manufacturers often release enhancements that improve obstacle detection, battery management, and mapping precision. Keeping the software current maximises the return on investment for any of the recommended mowers.
Tips & Pro Tips
- When placing magnetic strips, overlap the ends by at least 5 cm to avoid gaps that the mower could slip through.
- For large properties, map the yard in sections and merge them later; this reduces the chance of GPS drift during the initial scan.
- Use the app’s “Edge Trimming” feature (available on Mammotion and Segway models) to clean up borders that the mower cannot reach directly.
- Enable push notifications for low‑battery alerts; most apps will automatically send the mower back to the charging station, but a manual override can prevent unexpected shutdowns.
- If the mower repeatedly gets stuck on a specific obstacle, consider adding a small physical barrier or adjusting the virtual no‑go zone to give the mower a wider clearance path.
Troubleshooting
Problem: Mower wanders outside a defined zone.
Solution: Verify that the magnetic strip is continuous and that the app’s zone polygon matches the physical layout. Re‑calibrate the map if the mower has been moved manually.
Problem: Satellite signal loss causes the mower to pause.
Solution: Relocate the RTK antenna to a higher, unobstructed position using the extension cable provided with the ECOVACS model, or switch to the Husqvarna app’s “Wi‑Fi fallback” mode.
Problem: Battery depletes before completing a zone.
Solution: Reduce the zone size or increase the number of charging stations; the Segway Navimow supports multiple docking points for larger yards.
Conclusion
By installing the appropriate app, establishing reliable physical boundaries, creating well‑defined mowing zones, and performing regular maintenance, one can achieve a perfectly trimmed lawn with minimal manual effort. The recommended robot mowers each bring unique strengths that complement specific steps of the workflow, from AI vision detection to RTK‑level positioning. Implementing the strategies outlined in this guide will transform lawn care from a chore into an automated, enjoyable experience.
Products Mentioned in This Guide
Frequently Asked Questions
How do I install and set up the mapping app for my robot mower?
Download the mower’s native app on a compatible smartphone or tablet, create an account, and follow the on‑screen prompts to connect the mower via Wi‑Fi or cellular.
What steps are needed to create precise mowing zones using the app?
Launch the app, select ‘Create Zone’, trace the lawn perimeter, then draw sub‑zones around flower beds, pet areas, or slopes, and save the layout.
Why is defining separate mowing zones important?
Separate zones keep the mower out of delicate areas, protect equipment, and allow more efficient paths that save battery life and reduce mowing time.
What tools do I need besides the smartphone to map my lawn accurately?
A measuring tape or laser distance tool helps verify boundary dimensions, and a stable internet connection ensures the app syncs correctly.
How can I troubleshoot if the mower skips or misbehaves in a defined zone?
Check the zone boundaries for gaps or overlaps, ensure the app’s map is up‑to‑date, and verify the mower’s sensors are clean and calibrated.