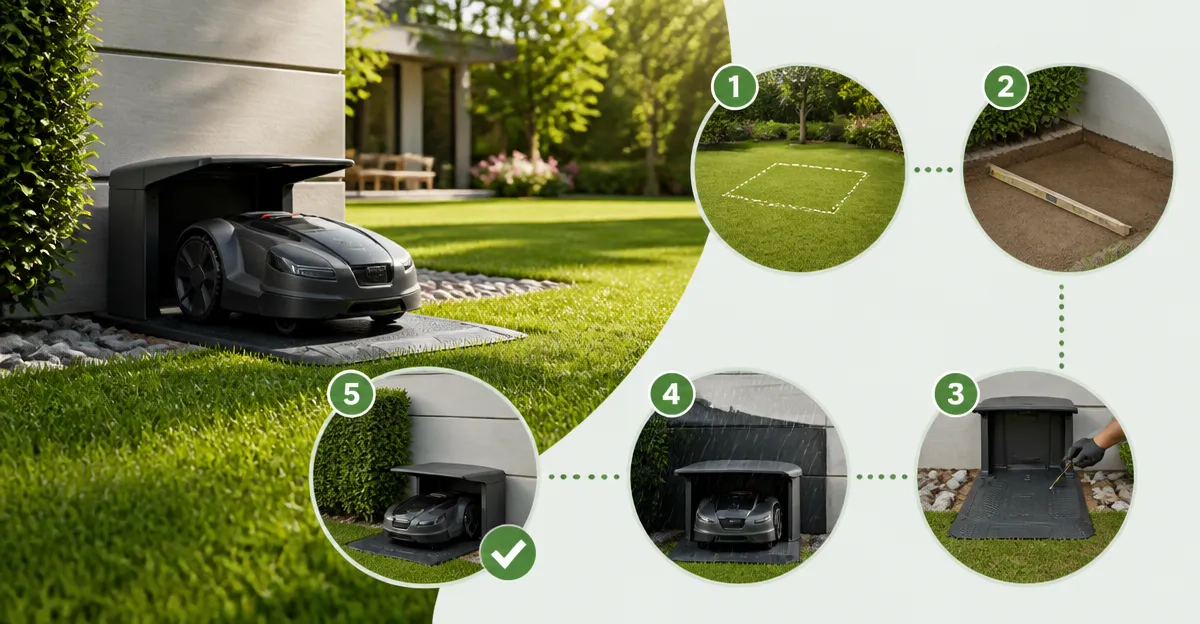
How to Place Your Robot Mower Docking Station: Step‑by‑Step Guide to Choosing the Best Location and Setup
Introduction
Choosing the correct location for a robot mower docking station is essential for reliable operation, battery longevity, and user convenience. This guide explains how to evaluate site conditions, prepare the ground, and install protective shelters that keep the mower functional throughout the year. Readers will gain a clear understanding of the factors that influence placement and will learn practical techniques that reduce maintenance effort.
By following the systematic process outlined below, one can avoid common pitfalls such as signal interference, water intrusion, and overheating. The instructions integrate real products that simplify each phase, yet the guide remains valuable even if a reader prefers alternative solutions.
What You'll Need
- Measuring tape and marking chalk
- Shovel or garden spade
- Level and compacting tool
- Power outlet with ground‑fault circuit interrupter (GFCI)
- Weather‑proof shelter (optional but recommended)
- Fastening hardware (anchor bolts, lawn anchors)
- Tools included with the chosen shelter (Allen keys, screwdriver)
All optional shelters referenced later are available through the links provided.
Step 1: Select a Suitable Location
The docking station must be positioned where the mower can easily locate it each night, while also allowing clear GPS and RTK signal penetration. Choose a flat area that is at least 1.5 meters away from large metal objects, dense foliage, or high walls that could block satellite signals. The site should be within the mower's maximum travel radius, typically 30‑50 meters from the farthest edge of the lawn.
Consider proximity to a weather‑protected power source. Running an outdoor‑rated extension cord is permissible, but a permanent outlet reduces tripping hazards. The ground should be level to prevent the mower from tipping while charging.
When a permanent shelter is desired, the location must also accommodate its footprint and anchoring system. For example, the vidaXL Robot Mower Garage measures 33.9" x 35.4" x 20.5" and fits comfortably on a compacted lawn area of roughly one square meter.
Assess the site during both sunny and rainy conditions to verify that water will not pool around the docking station. Proper drainage prevents corrosion of electrical components.
Step 2: Prepare the Ground Surface
Begin by marking the exact perimeter of the docking area with chalk. Remove any grass, weeds, or debris within the marked zone using a shovel. For optimal stability, excavate to a depth of 5‑7 centimeters and replace the soil with a compacted layer of crushed stone or fine gravel. This substrate promotes drainage while providing a firm base for the shelter.
After laying the base material, use a hand tamper or plate compactor to achieve a level surface. Verify the flatness with a carpenter's level; the tolerance should not exceed 2 centimeters across the entire area. A level surface prevents the mower from rolling off the dock and ensures that the shelter sits evenly.
If the chosen shelter includes anchoring bolts, embed them now according to the manufacturer's instructions. The Sunseeker S4 Garage provides pre‑drilled mounting holes that align with standard garden anchors, simplifying this step.
Finally, run a weather‑rated power cable from the nearest GFCI outlet to the docking station, securing it with cable clips to avoid tripping hazards.
Step 3: Install the Docking Station
Place the docking station on the prepared surface, aligning it with the pre‑drilled holes if a shelter will be attached later. Verify that the charging contacts are clean and unobstructed. Most manufacturers recommend a brief cleaning with a dry cloth before initial use.
Secure the dock using the supplied bolts or brackets. Tighten all fasteners evenly to avoid warping the unit. If the dock includes a built‑in control panel, ensure that the flip‑up cover can be accessed without obstruction; the Navimow Garage S features a convenient flip‑up cover that facilitates panel access while protecting the dock from rain.
Connect the power cable to the dock, then test the charging function by placing the mower on the station. Observe the indicator lights for a steady charge signal. If the mower fails to dock, adjust its position by a few centimeters until the contacts align perfectly.
Document the exact coordinates of the dock in the mower's companion app; many apps allow manual entry of a home point to improve navigation accuracy.
Step 4: Add Weather Protection
Exposure to sun, rain, and wind can degrade both the docking station and the mower's battery over time. Installing a dedicated shelter mitigates these risks and extends the service life of the equipment. Several options are available, each offering distinct advantages.
The vidaXL Robot Mower Garage provides a poly rattan frame with a powder‑coated steel skeleton. Its sloping top design directs rainwater away, while the synthetic rattan material resists UV fading. Priced at $38.49 and rated 4.3/5 from 130 reviews, it offers an affordable entry point for homeowners on a budget.
For users seeking higher durability, the Sunseeker S4 Garage employs PP and PA6+GF30 composites that resist deformation under intense sunlight. At $178.13 with a 4.1/5 rating, it delivers all‑season protection and includes reinforced metal supports that anchor securely to the ground.
If the mower model is larger or requires a more spacious enclosure, the Large Robot Mower Garage Shelter accommodates broader chassis dimensions and features a 3D convection ventilation system that prevents overheating. Priced at $79.89 and holding a 4/5 rating, it combines ample interior space with a sleek white roof that blends into garden aesthetics.
For a universal, foldable solution, the Robot Mower Garage Shelter uses a thickened 600D Oxford fabric with double UV coating. Its stainless‑steel frame and wind‑proof anchors make it suitable for regions with strong gusts. At $69.77 and a 4/5 rating, it offers a balance of portability and protection.
When installing any shelter, follow the manufacturer's assembly guide, using the included Allen keys and screws. Ensure that the opening is barrier‑free to allow smooth entry and exit for the mower without damaging radar sensors.
Step 5: Connect Power and Test Full Operation
After the shelter is secured, verify that the power cable remains protected from direct exposure. If the shelter includes built‑in cable routing channels, thread the cable through them to maintain a clean appearance. Plug the dock into the GFCI outlet and observe the charging indicator.
Run the mower through a full mowing cycle to confirm that it can locate the dock under shelter conditions. Pay attention to any signal loss; if the mower hesitates near the dock, consider adjusting the shelter's position by a few centimeters to improve line‑of‑sight to the GPS satellites.
Document the final setup with photographs for future reference. This visual record assists in troubleshooting and helps new household members understand the layout.
Finally, schedule a monthly inspection to clear debris from the shelter roof, tighten any loosened anchors, and clean the charging contacts. Regular maintenance preserves the integrity of the protective enclosure and the docking station.
Tips & Pro Tips
- Place the dock on a surface that does not expand or contract significantly with temperature changes; concrete or compacted stone are ideal.
- When using a shelter with a vented design, ensure that the ventilation openings are not obstructed by overgrown plants.
- Install a small solar panel on the shelter roof if the mower supports solar charging; this reduces reliance on grid power.
- Use a ground‑level marker (painted stone or metal plate) to indicate the exact docking spot for easy alignment during seasonal repositioning.
- Consider adding a small drip edge to the shelter roof to further direct rainwater away from the dock.
Troubleshooting
Problem: Mower fails to locate the dock after shelter installation.
Solution: Verify that the shelter material does not block GPS signals. The Robot Mower Garage Shelter is designed with a signal‑permeable structure; if using a different material, add a small opening near the top of the shelter.
Problem: Charging indicator flashes intermittently.
Solution: Check that the power outlet is GFCI protected and that the cable is not pinched by the shelter frame. Re‑route the cable if necessary.
Problem: Water accumulates inside the shelter.
Solution: Ensure the roof slope is adequate; the vidaXL Robot Mower Garage features a sloping top that naturally sheds water. Clear any debris that may block drainage paths.
Conclusion
Proper placement of a robot mower docking station enhances navigation reliability, protects the battery from environmental stress, and simplifies daily operation. By selecting a level, signal‑friendly location, preparing a stable base, installing a compatible shelter, and performing regular checks, one can ensure years of dependable service. The products highlighted in this guide provide practical solutions for each stage, yet the underlying principles remain applicable regardless of brand choice.
Readers are encouraged to assess their own garden conditions, apply the step‑by‑step methodology, and enjoy the convenience of an automated lawn care system that operates flawlessly.
Products Mentioned in This Guide
Frequently Asked Questions
What is the ideal distance between the robot mower docking station and the lawn edge?
Place the dock within 1‑2 meters of the lawn edge so the mower can easily locate it without navigating obstacles.
Do I need a GFCI‑protected outlet for the docking station?
Yes, a GFCI‑protected outdoor outlet prevents electrical hazards and complies with safety codes.
Can the docking station be installed on uneven ground?
No, the surface should be leveled and compacted to ensure a stable connection and proper charging.
Is a weather‑proof shelter necessary for the docking station?
While optional, a shelter protects the dock from rain, snow, and UV damage, extending its lifespan.
How far should the charging cable reach from the outlet to the dock?
Use a short, outdoor‑rated extension cord no longer than 3 meters to minimize voltage drop and maintain safety.