How to Install a Robot Lawn Mower on an Irregular Small Lawn: Step-by-Step Setup, Boundary Tips & Troubleshooting
Introduction
This guide explains how to install a robot lawn mower on an irregular small lawn, covering preparation, boundary definition, connectivity, and troubleshooting. One will learn how to choose the appropriate model, configure wireless navigation, and maintain optimal performance. The instructions are designed for homeowners who have limited time but desire a consistently neat lawn. By following the steps, one can achieve a hands‑free mowing solution that adapts to complex yard shapes.
What You'll Need
- Robot lawn mower (choose from the models listed below)
- Magnetic boundary strips (included with most models)
- Power outlet near the mowing area for the charging station
- Smartphone with iOS or Android for app configuration
- Measuring tape, level, and basic hand tools
- Optional: RTK extension cable for enhanced positioning (included with ECOVACS model)
Step-by-Step Instructions
Step 1: Assess Lawn Geometry and Prepare the Surface
Begin by walking the perimeter of the lawn and noting irregularities such as flower beds, pathways, and slopes. Measure the total square footage and record any obstacles that exceed 2 inches in height, because most robot mowers cannot clear large items. Clear the surface of debris, sticks, and toys to prevent the mower from becoming stuck during its first run. This preparation ensures that the mapping algorithm can generate an accurate virtual map.
Step 2: Choose the Appropriate Robot Mower Model
For irregular lawns up to 1,600 sq ft, the YARDCARE V100 Robot Lawn Mower offers intelligent visual navigation and a magnetic strip for quick no‑go zones. It costs $399.99, holds a 4.7‑star rating from 102 reviews, and includes a 4 Ah battery that lasts several hours. The V100 is ideal for small yards because it uses a camera‑based system that distinguishes grass from non‑grass and avoids up to 150 obstacles.
If the lawn exceeds 2,000 sq ft or contains complex terrain, the ECOVACS Goat O1000 RTK Mower Kit provides centimeter‑level RTK precision navigation without perimeter wires. Priced at $664.00 with a 4‑star rating from 103 reviews, it includes 36 extra blades and an RTK extension cable for stronger satellite signal. This model excels on irregular lawns because it follows systematic mowing paths rather than random patterns.
For homeowners who desire dual‑zone capability and advanced 3D obstacle avoidance, the YARDCARE N1600PRO Robot Lawn Mower offers RTK plus vision navigation, multi‑zone control, and a brushless motor. It costs $659.99, carries a perfect 5‑star rating from 18 reviews, and can manage up to 0.4 acre. This model is recommended when the yard has multiple distinct sections such as a front garden and a rear patio.
For budget‑conscious users who need basic wire‑free operation, the LEBOSBO V3 Robot Lawn Mower provides AI vision obstacle sensing and magnetic no‑go strips. At $429.99 with a 3.6‑star rating from 22 reviews, it is suitable for lawns up to 1,600 sq ft but may experience occasional wheel slippage on steep slopes.
Finally, for premium performance on up to a quarter‑acre with 360° LiDAR and AI vision, the MOVA LiDAX Ultra 1000 Robot Mower offers wireless RTK‑free setup, edge‑to‑edge cutting, and dual‑map management. It is priced at $999.00, holds a 4.1‑star rating from 71 reviews, and includes a 3‑year warranty. This model is best for users who require precise edge trimming and steep‑slope capability.
Step 3: Install Boundary Definition (No‑Go Zones)
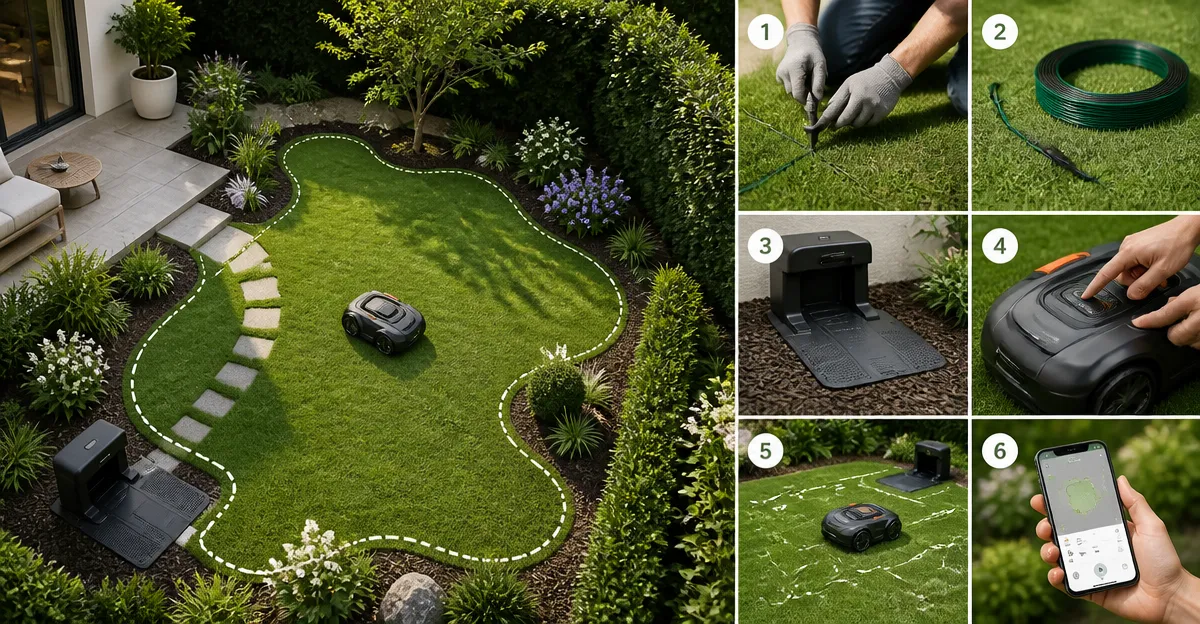
Place the magnetic strip provided with the chosen mower along the edges of flower beds, pools, or pathways that should remain untouched. The strip is 32 ft long and can be cut to size with scissors. Secure the strip to the ground using the supplied pegs, ensuring that the metal side faces upward for the mower to detect it. For the ECOVACS model, the RTK extension cable can be positioned near the antenna to improve satellite reception in areas with dense foliage.
When using the LEBOSBO V3, be aware that the AI vision system may not remember obstacles permanently; therefore, magnetic strips provide a reliable fallback. The YARDCARE V100 relies heavily on its visual sensor, so clear, contrasting strips improve detection accuracy. Verify that all strips form a continuous loop without gaps, because gaps can cause the mower to exit the intended area.
Step 4: Set Up Power and Charging Station
Place the charging station on a flat, level surface near an outdoor‑rated power outlet. Use a level to ensure the station is not tilted, as an uneven base can affect the robot’s docking accuracy. Connect the charger to the outlet and allow the mower to charge to 100 % before the first mapping run. For models with a larger battery, such as the MOVA LiDAX Ultra 1000 (45 Wh), a full charge may take up to three hours.
Keep the charging area clear of water splashes and ensure the dock is protected from direct sunlight, which can degrade plastic components over time. The ECOVACS O1000 includes a dedicated charging dock that aligns automatically with the mower’s charging contacts.
Step 5: Configure Wireless Connectivity and App
Download the manufacturer’s app from the App Store or Google Play. Open the app and create an account, then follow the on‑screen instructions to pair the mower via Bluetooth or Wi‑Fi. For the YARDCARE V100, enable the Wi‑Fi hotspot on the mower if the home network is weak; the device can operate on a dedicated 2.4 GHz signal. The ECOVACS O1000 benefits from a stable Wi‑Fi connection because its RTK data stream requires consistent bandwidth.
Enter the lawn dimensions manually or allow the app to import the mapping data after the first run. Set the preferred cutting height, schedule, and any zone‑specific parameters. The MOVA LiDAX Ultra 1000 app offers dual‑map management, enabling separate schedules for front and back yards.
Step 6: Perform Initial Mapping and Calibration
Press the start button on the mower or initiate the mapping sequence from the app. The robot will drive around the perimeter, using its sensors to create a virtual map. During this phase, observe the mower as it encounters obstacles; the AI vision or RTK system will record the locations for future avoidance. The mapping process typically takes 15‑30 minutes for a 1,600 sq ft lawn.
If the mower fails to detect a boundary, pause the run, adjust the magnetic strip, and restart the mapping. For the ECOVACS O1000, verify that the RTK antenna has a clear view of the sky; otherwise, positioning accuracy may degrade.
Step 7: Test Mowing Paths and Adjust Settings
After the map is saved, initiate a short mowing session covering a single zone. Observe the cutting pattern; systematic mowing (U‑shaped) produces even lines, while random patterns may leave visible tracks. Adjust the cutting height using the app or the physical selector on the mower; most models allow heights between 0.8 in and 3.9 in.
If the mower leaves uncovered edges, enable the edge‑to‑edge feature (available on the MOVA LiDAX Ultra 1000) or manually guide the mower along the border to teach it the boundary. For steep slopes, reduce the speed setting if the model offers it, as the rear‑wheel drive of the MOVA and YARDCARE N1600PRO can handle up to 45 % grade.
Step 8: Ongoing Maintenance and Blade Replacement
Inspect the blades after every 20‑hour mowing cycle. The ECOVACS O1000 CARE bundle includes 36 extra blades, extending maintenance intervals and reducing long‑term cost. Replace dull blades promptly to maintain a clean cut and prevent tearing of grass. Clean the underside of the mower after each run to remove clippings that could obstruct sensors.
Check the battery health every three months; most lithium‑ion packs retain 80 % capacity after 500 charge cycles. Store the mower in a dry location during winter and charge the battery to 75 % if the device will be idle for more than a month.
Tips & Pro Tips
- Use a garden hose to rinse the mower’s underside after heavy rain to prevent mud buildup on the sensors.
- Place the charging station on a raised platform if the lawn is prone to flooding.
- For irregular shapes, create multiple virtual zones in the app rather than a single large area; this improves efficiency.
- Enable the anti‑theft alarm on the MOVA LiDAX Ultra 1000 for added security if the mower is stored in an accessible area.
- Document the location of magnetic strips with garden markers to avoid accidental removal during landscaping.
Troubleshooting
Problem: Mower loses Wi‑Fi connection.
Solution: Relocate the router closer to the charging station or enable a dedicated 2.4 GHz hotspot on the mower. Verify that there are no metallic objects between the router and the mower that could cause interference.
Problem: Mower repeatedly stops at a specific spot.
Solution: Inspect the area for hidden obstacles such as small rocks or garden hoses. Use the app’s live camera feed (available on MOVA and ECOVACS models) to identify the trigger and clear the obstruction.
Problem: Edge cutting leaves a gap larger than 2 inches.
Solution: Activate the UltraTrim disc on the MOVA LiDAX Ultra 1000 or manually guide the mower along the edge during the first few runs to train the AI system.
Conclusion
By following the steps outlined above, one can install a robot lawn mower on an irregular small lawn with confidence and minimal effort. Selecting the appropriate model, defining magnetic boundaries, and configuring the app ensure reliable operation and a consistently manicured appearance. Ongoing maintenance, such as blade replacement and battery care, prolongs the lifespan of the device and maximizes return on investment. The reader is now equipped to enjoy a hands‑free mowing experience that adapts to complex yard layouts.
Products Mentioned in This Guide
Frequently Asked Questions
What is the best way to define boundaries on an irregular small lawn?
Use magnetic boundary strips placed tightly around the lawn’s perimeter, following every nook and ensuring strips overlap at corners for a continuous loop.
Do I need a special charging station for a small irregular yard?
A standard charging station works; just place it on level ground near a power outlet where the mower can easily reach all areas.
Can I install a robot mower without professional tools?
Yes, basic tools like a measuring tape, level, and screwdriver are sufficient for most home installations.
How does the mower navigate complex shapes without GPS?
It follows the magnetic boundary and uses built‑in sensors and optional RTK extension for precise positioning around obstacles.
What common troubleshooting steps fix connectivity issues with the app?
Restart the mower, ensure the Wi‑Fi network is 2.4 GHz, and re‑pair the device in the app’s settings.